How to copy DVDs to your mac hard drive

Note: These instructions originally appeared on c/net on 12/2009. Most macs no longer have a disc drive, so that part of the instructions may not work all mac users today, e.g., you’ll have to get yourself an external disc player. The original article is attributed to Joe Aimonetti — but his profile link now leads to a 404 page.

When faced with the necessity of making a copy of an unprotected DVD disc, Mac users should not worry–Mac OS X makes it simple. Keep in mind that these directions are only for copying DVDs that do not have any form of copy protection encoded on them.

Follow these directions to make a copy of your unprotected DVD:

  1. Insert your DVD into your Mac. Most Macs will automatically launch DVD Player. Once it launches, quit it. You should see your DVD disc mounted on your Desktop.
  2. Open Disk Utility (Applications > Utilities). Select the DVD disc from the list on the left. You will notice that there are two DVD icons–select the one slightly indented (this is the DVD itself, whereas the first one is the drive).
  3. Click on “New Image” in the Disk Utility main window.
  4. Choose a name and a destination from the “Save As…” window. Keep in mind that your destination should have enough space to copy the entire DVD, which can be over four gigs.
  5. In the “Save As…” window, be sure the “Image Format” selection is set to “DVD/CD Master” and the “Encryption” selection is set to “none”. Click Save.
  6. After copying the DVD to your destination drive, return to Disk Utility. Your new Disk Image will appear in the list on the left of the Disk Utility window. Eject the original DVD disc from your Mac.
  7. Insert a writable DVD disc into your Mac. Select your newly created Disk Image from the list on the left of the Disk Utility window. Click on “Burn” in the Disk Utility main window. Select your burn speed and whether you would like to Verify Burned Data.
  8. You will receive confirmation once you DVD is successfully burned and you are all set with a fresh copy of your DVD disc. Simply save your new Disk Image and you can make a copy whenever you may need it.

How to edit the hosts file in Mac OS X – Leopard

I recently had a situation where, after a failed attempt at configuring an AMPPS development environment on my macbook pro, I suddenly was unable to visit one of my websites — the http address would not resolve. I could reach it by FTP, just not by any browser. What was fishy was that I could reach the website from other computers on the SAME network, just not my laptop. The website address was the only one that was effected on the laptop, I could visit other sites fine. The website address in question was the same site I had created a copy of in my AMPPS development environment. A support rep pointed me in the direction of editing my system’s hosts file, but didn’t know how to do it on a mac. Thank you Giannis in Thessaloniki, Greece, for posting the solution. Originally posted on the blog “Decoding the Web.” Original link: http://decoding.wordpress.com/2009/04/06/how-to-edit-the-hosts-file-in-mac-os-x-leopard/ 
 

Introduction

The hosts file is a text file that maps hostnames to IP addresses.
Upon typing a url address on the browser, the system is checking if there is a relevant entry on the hosts file and gets the corresponding IP address, else it resolves the IP via the active connection’s DNS servers.

The hosts file can be edited to block certain hostnames (like ad-serving/malicious hosts), or used for web development purposes, i.e. to redirect domains to local addresses.

Editing the hosts file

Editing the hosts file in Mac OS X – Leopard, is a pretty easy task, especially if you are familiar with the terminal.

Step 1 – Open the Terminal.app

Either by start typing Terminal on the Spotlight, or by going into Applications -> Utilities -> Terminal.

Step 2 – Open the hosts file

Open the hosts by typing on the Terminal that you have just opened:

$ sudo nano /private/etc/hosts

Type your user password when prompted.

Step 3 – Edit the hosts file

The hosts file contains some comments (lines starting with the # symbol), as well as some default hostname mappings (e.g. 127.0.0.1 – localhost).
Simply append your new mappings underneath the default ones. Or edit one of the default values if you know what you are doing!
You can navigate the file using the arrow keys.

Step 4 – Save the hosts file

When done editing the hosts file, press control-o to save the file.
Press enter on the filename prompt, and control-x to exit the editor.

Step 5 – Flush the DNS cache

On Leopard you can issue a simple Terminal command to flush the DNS cache, and have your host file changes to take immediate effect:

$ dscacheutil -flushcache

You can now test your new mapping on the browser!

How to ByPass Video Region Restrictions in Under a Minute

Found this on Digital Trends .com, while searching for a way to view the wikileaks film “Mediastan”.

By   —   October 19, 2012
How to skip region restrictions with a proxy
I’m not going to lie to you: My girlfriend and I are big, sappy, aristocrat-loving “Downton Abbey” fans. So when season three debuted in September, we could hardly wait to start watching. Problem is, the show is currently only available to viewers in the U.K., and won’t make its way stateside until January 6, 2013. Impatient, we frantically began searching for a way around this useless (to us) hurdle — but we weren’t willing to start downloading things illegally.

Such is the dilemma of many Web users who try to access U.S.-made content from their respective international homes. Hulu, ABC, NBC, and even “The Daily Show” are blocked in many countries not called the United States. This is also true of music services like Spotify, and a wide range of other sites and services across the Web. Similarly, those of us in the U.S. cannot use BBC iPlayer, or, in the case of “Downton Abbey” fans, iTV Player.

Now, there are quite a few solutions to the problem of region restrictions. Unfortunately, the most user-friendly options, like a Virtual Private Network (VPN), usually cost money (not a lot, but some), or are complicated to use if the most technical thing you’ve ever done with your PC is install Firefox. There are also options like Tor, the anonymization software that masks your identity. And this is a fine option, but does involve downloading and getting to know additional software.

Fortunately for those of us who are not technical wizards, there is a quick and easy way to bypass region blocks in less than a minute, for free. I’m talking about using a proxy, and it’s surprisingly simple to use. (If you already know all about proxies and how to use them, feel free to move along — this one isn’t for you.)

Proxy basics

Before we get into the how-to bit, some background: Each time you go online, your computer is assigned an IP address. Your IP address, which is transmitted to every website you visit through your browser, tells these sites what your physical location is. This is why region blocks work — they simply forbid any computer with an IP address outside a particular geographic region from accessing content. By using a proxy, you actually change the IP address that your browser transmits to the Web.

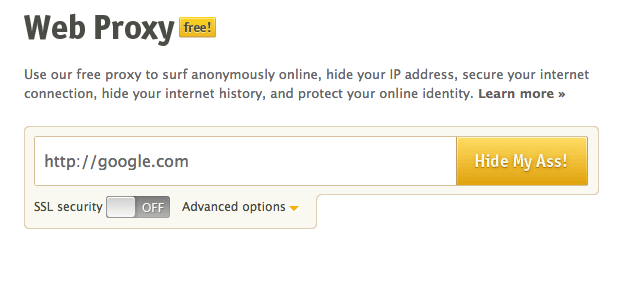
The simplest way to use a proxy is to visit the mildly-NSFW-named VPN provider Hide My Ass(HMA), which allows you to simply paste a URL into its Web Proxy tool and start browsing under a different IP address. Under the “advanced settings” tab, you can choose which country you want to appear to be browsing from. Website Proxify offers a similar service, as well. Easy though it may be, however, this solution will not work with certain websites. And, because so many other people are trying to use the same proxy address as you, load times slow to a slug-like pace.

HMA web proxy

Another solution is to establish your own proxy through your Web browser. You can either do this through the browser itself, or by downloading a plugin, like Proxy Switchy for Chrome, orFoxyProxy for Firefox.

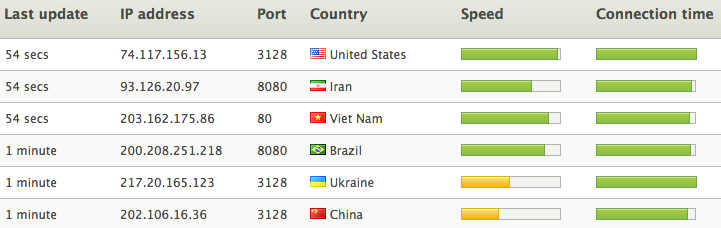
To use any of these options, you’re going to need to find a proxy IP address and port. HMA generously offers a constantly updated list of these. You’ll want to pick a proxy that is from the same country as the content you want to access. (So for “Downton Abbey,” I would choose a U.K.-based proxy.) Also check to make sure the “speed” and “connection” categories are good — if they’re not, you will experience a maddening series of interruptions.

How to use FoxyProxy

After going through a headache of glitches, we found the very best option is to use Firefox, andinstall the FoxyProxy add-on. Once you’ve done that, head over to the HMA proxy list page. Select your country of choice. Under the “Protocol” options, de-select “socks4/5.” (Just for simplicity’s sake.) Then hit “Update Results.”

HMA proxies

At this point, you will also want to open FoxyProxy by hitting the icon that appears to the right of the URL box. Click “Add New Proxy.” Next, head back over to the HMA page and find a proxy that looks good (the bars next to the country name should both be green). Once you’ve selected one, copy the IP address, and paste it into the “Host or IP Address” field in the FoxyProxy window. Go back to HMA, and copy the “port” number that appears next to the IP address you’ve chosen. Paste the port number in the “Port” field in the FoxyProxy window. Then click “Ok.” (Don’t worry, you’re almost done.)

foxyproxy 1

A notice will then pop up saying “you didn’t enter and enable any whitelisted (included) URL patters.” For our purposes, you can just ignore that — click “OK.” At the top of the FoxyProxy window, click on the drop-down menu next to “Select Mode,” then select the option that includes the IP address you just entered. Click close — and you’re done! Start streaming.

foxyproxy 2

If you want to turn off the proxy, just click the FoxyProxy button, and change the mode to “Completely disable FoxyProxy.”

The downsides

Now, cheating the system never works out flawlessly. The first thing you MUST consider are your local laws. In the U.S., it is legal to use proxies. In other countries, it might not be — so check to make sure you’re in the clear before doing any of this. And, at the very least, you will likely be violating the terms of service of the websites you visit. In short: Whether or not this is legal doesn’t necessarily make it right.

Perhaps more important to remember is that, by using a proxy, you are literally sending everything you do on the Web through another computer. This means whoever has access to the proxy machine can technically access all your usernames, passwords, and other highly sensitive, personal information you send through it. So don’t — never use a proxy you don’t have complete control over to perform high-risk tasks, like online payments or banking.

Even if using a proxy is legal, and you don’t mind the ethical gray areas, you’re probably going to have to change the specific proxy you use on a regular basis. Free proxies, like those available through HMA, often get shut down, or are just too slow for streaming purposes. That said, you can get access to high-quality proxies through FoxyProxy, but it’ll cost you a few bucks a month for a subscription — totally worth it, if you plan to leap over region restrictions on a regular basis.


Mac OS X – Show / Hide Hidden Files

This content was originally posted at http://www.brooksandrus.com/blog/2007/03/23/mac-os-x-show-hide-hidden-files-in-finder/

———————————————————————————————

I always forget how to do this because I toggle this rather sporadically so I’m adding it to the public record.

To show hidden files in Finder pop open your terminal and type the text shown in the screen grab below.

To go back to hiding files we obviously just flip the AppleShowAllFiles flag to FALSE.

*Update*
As noted in the comments its nice to have the text available for easy copy and paste into your terminal.

Show:

defaults write com.apple.finder AppleShowAllFiles TRUE
killall Finder

Hide:

defaults write com.apple.finder AppleShowAllFiles FALSE
killall Finder

*Update 2*

You can use this script toggle between states:

# check if hidden files are visible and store result in a variable
isVisible=”$(defaults read com.apple.finder AppleShowAllFiles)”

# toggle visibility based on variables value
if [ “$isVisible” = FALSE ]
then
defaults write com.apple.finder AppleShowAllFiles TRUE
else
defaults write com.apple.finder AppleShowAllFiles FALSE
fi

# force changes by restarting Finder
killall Finder

You can also download an Automator application which will toggle hidden file visibility here:

http://www.brooksandrus.com/downloads/show_files.zip

How To Hack An Electronic Road Sign

This information was copied from jalopnik.com

DO NOT under any circumstances run around hacking into electronic road signs using the information contained in this step-by-step guide of how to transmit hilarious messages to passing motorists.

How many times have you driven by an electronic road sign like one of these? This is the ADDCO portable sign. Today, you see what is on the inside, and how they are programmed to display important information.

*** WARNING YOU SHOULD NEVER TAMPER WITH THESE SIGNS ***

  • The access panel on the sign is generally protected by a small lock, but often are left unprotected. Upon opening the access panel you can see the display electronics.
  • The black control pad is attached by a curly cord, with a keyboard on the face.
  • Programming is as simple as scrolling down the menu selection to “Instant Text”. Type whatever you want to display, Hit Enter to submit. You can now either throw it up on the sign by selecting “Run w/out save” or you can add more pages to it by selecting “Add page”

** HACKER TIPS **

Should it ask you for a password try “DOTS”, the default password. In all likelihood, the crew will not have changed it. However if they did, never fear. Hold “Control” and “Shift” and while holding, enter “DIPY”. This will reset the sign and reset the password to “DOTS” in the process. You’re in!